想要构建具有现实世界功能的智能代理?使用 Google ADK 构建可以推理、委托和动态响应的代理。本 Google ADK 教程将引导您了解使用 Google ADK 跨 Gemini 和GPT 等不同语言模型构建会话式代理的步骤。无论您是在探索用于人工智能代理的 Google ADK,还是对如何使用 Google ADK 创建人工智能代理感到好奇,本实践指南都将帮助您轻松、清晰地开启代理开发之旅。
什么是代理开发工具包?
代理开发工具包(ADK)是一个灵活的模块化框架,用于开发和部署人工智能代理。它可与流行的 LLM 和开源生成式人工智能工具一起使用,并可与 Google 生态系统和 Gemini 模型紧密集成。ADK 可让您轻松开始使用由 Gemini 模型和谷歌人工智能工具驱动的简单代理,同时提供更复杂的代理架构和协调所需的控制和结构。
谷歌代理开发工具包的特点
- 多代理架构:在并行、顺序或分层工作流中组合代理。
- 灵活的协调:使用 LLM 驱动的工作流动态路由任务。
- 丰富的工具生态系统:无缝使用内置、自定义和第三方工具。
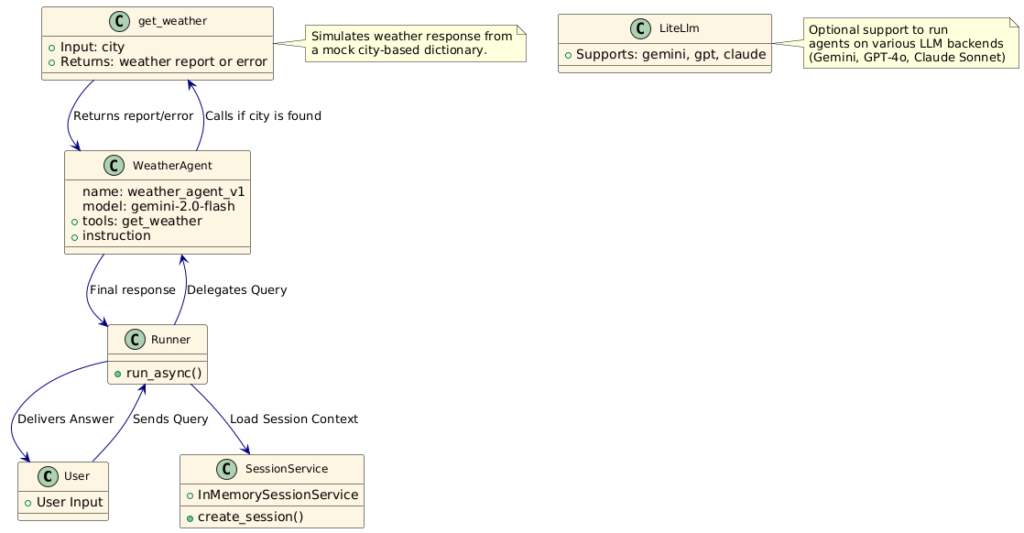
- 与模型无关:支持 Gemini、GPT-4o、Claude、Mistral 等。
- 流功能:文本、音频和视频的实时流。
- 开发友好型工具:CLI、Web UI、可视化调试和评估工具。
- 内存和状态管理:内置会话和长期内存处理功能。
- 人工制品处理:轻松管理文件、输出和二进制数据。
- 智能执行:代理可执行代码并处理多步骤规划。
- 多功能部署:可在本地、谷歌云(Vertex AI、Cloud Run)或 Docker 上运行。
问题陈述
随着人工智能系统从单一用途的工具发展为协作式多代理生态系统,开发人员在构建和协调可通信、可委派和可适应的智能代理方面需要实用的指导。为了弥补这一差距,我们将建立一个天气机器人团队(Weather Bot Team),这是一个多代理系统,能够回答与天气有关的询问,同时还能处理问候、告别和安全响应等用户交互。
本实践项目旨在演示如何
- 使用谷歌的代理开发工具包(ADK)设计一个模块化的多代理系统。
- 整合多种语言模型(如 Gemini、GPT、Claude),实现任务专业化。
- 在各代理间实施智能任务委托。
- 管理会话内存,实现上下文的连续性。
- 通过结构化回调应用安全机制。
通过解决这个问题,您将获得 ADK 架构、协调、内存管理和安全最佳实践方面的实际经验,为更复杂、更真实的代理应用奠定基础。
您可以参考所提供的 Colab notebook 来指导您完成实践实施。
建议的工作流
前提条件
在深入学习代码之前,请确保您已完成以下设置步骤:
1. 设置环境并安装ADK
首先创建并激活虚拟环境,以隔离项目依赖关系:
# Create a virtual environment
python -m venv .venv
现在环境已经创建,我们可以使用以下命令激活它:
# Activate the environment
# macOS/Linux:
source .venv/bin/activate
# Windows CMD:
.venv\Scripts\activate.bat
# Windows PowerShell:
.venv\Scripts\Activate.ps1
环境激活后,安装Google AI 开发工具包 (ADK) :
pip install google-adk
2. 获取 API 密钥
您需要 API 密钥才能与不同的人工智能模型进行交互。从以下来源获取:
- 从 Google AI Studio 获取:https://aistudio.google.com/app/apikey
- 从 OpenAI Platform 获取:https://platform.openai.com/api-keys
- 从 Anthropic Console 获取:https://console.anthropic.com/settings/keys
创建天气应用程序的步骤
第 1 步:设置和安装
安装项目所需的库:
# Install Google ADK and LiteLLM
!pip install google-adk -q
!pip install litellm -q
导入库:
import os
import asyncio
from google.adk.agents import Agent
from google.adk.models.lite_llm import LiteLlm # For multi-model support
from google.adk.sessions import InMemorySessionService
from google.adk.runners import Runner
from google.genai import types # For creating message Content/Parts
import warnings
# Ignore all warnings
warnings.filterwarnings("ignore")
import logging
logging.basicConfig(level=logging.ERROR)
设置 API 密钥:
# Gemini API Key
os.environ["GOOGLE_API_KEY"] = "YOUR_GOOGLE_API_KEY"
# OpenAI API Key
os.environ['OPENAI_API_KEY'] = “YOUR_OPENAI_API_KEY”
# Anthropic API Key
os.environ['ANTHROPIC_API_KEY'] = “YOUR_ANTHROPIC_API_KEY”
print("API Keys Set:")
print(f"Google API Key set: {'Yes' if os.environ.get('GOOGLE_API_KEY') and os.environ['GOOGLE_API_KEY'] != 'YOUR_GOOGLE_API_KEY' else 'No (REPLACE PLACEHOLDER!)'}")
print(f"OpenAI API Key set: {'Yes' if os.environ.get('OPENAI_API_KEY') and os.environ['OPENAI_API_KEY'] != 'YOUR_OPENAI_API_KEY' else 'No (REPLACE PLACEHOLDER!)'}")
print(f"Anthropic API Key set: {'Yes' if os.environ.get('ANTHROPIC_API_KEY') and os.environ['ANTHROPIC_API_KEY'] != 'YOUR_ANTHROPIC_API_KEY' else 'No (REPLACE PLACEHOLDER!)'}")
# Configure ADK to use API keys directly (not Vertex AI for this multi-model setup)
os.environ["GOOGLE_GENAI_USE_VERTEXAI"] = "False"
定义模型常量,方便使用:
MODEL_GEMINI_2_0_FLASH = "gemini-2.0-flash".
MODEL_GPT_4O = "openai/gpt-4o"
MODEL_CLAUDE_SONNET = "anthropic/claude-3-sonnet-20240229"
print("\nEnvironment configured.")
第 2 步:定义工具
在 ADK 中,“工具”是功能构件,让代理不仅能生成文本。它们通常是简单的 Python 函数,可以执行实际操作,如获取天气数据、查询数据库或运行计算。
首先,我们将创建一个模拟天气工具来模拟天气查询。这有助于我们专注于代理的结构,而不需要外部 API。之后,我们可以轻松地将其替换为真正的天气服务。
代码
def get_weather(city: str) -> dict:
"""Retrieves the current weather report for a specified city.
Args:
city (str): The name of the city (e.g., "Mumbai","Chennai","Delhi").
Returns:
dict: A dictionary containing the weather information.
Includes a 'status' key ('success' or 'error').
If 'success', includes a 'report' key with weather details.
If 'error', includes an 'error_message' key.
"""
# Best Practice: Log tool execution for easier debugging
print(f"--- Tool: get_weather called for city: {city} ---")
city_normalized = city.lower().replace(" ", "")  # Basic input normalization
mock_weather_db = {
"delhi": {"status": "success", "report": "The weather in Delhi is sunny with a temperature of 35°C."},
"mumbai": {"status": "success", "report": "It's humid in Mumbai with a temperature of 30°C."},
"bangalore": {"status": "success", "report": "Bangalore is experiencing light showers and a temperature of 22°C."},
"kolkata": {"status": "success", "report": "Kolkata is partly cloudy with a temperature of 29°C."},
"chennai": {"status": "success", "report": "It's hot and humid in Chennai with a temperature of 33°C."},
}
if city_normalized in mock_weather_db:
return mock_weather_db[city_normalized]
else:
return {"status": "error", "error_message": f"Sorry, I don't have weather information for '{city}'."}
# Example usage
print(get_weather("Mumbai"))
第 3 步:定义代理
在 ADK 中,Agent 是管理对话流的核心组件,它连接着用户、LLM 及其可使用的工具。
要定义一个代理,需要配置几个基本参数:
- name:代理的唯一标识符(如“weather_agent_v1”)。
- model:代理将使用的 LLM(例如,MODEL_GEMINI_2_5_PRO)。
- description:描述: 对该代理所做工作的简短概括–这对多代理系统中的协作和授权至关重要。
- instruction:LLM 的详细行为指南,定义其角色、目标、如何使用工具以及如何处理边缘情况。
- tools:代理可以调用的工具功能(如 [get_weather])列表。
代码 :
AGENT_MODEL=model
weather_agent=Agent(
name="weather_agent_v1",
model=AGENT_MODEL,
description="Provides weather information for specific cities.",
instruction="You are a helpful weather assistant. Your primary goal is to provide current weather reports. "
"When the user asks for the weather in a specific city, "
"you MUST use the 'get_weather' tool to find the information. "
"Analyze the tool's response: if the status is 'error', inform the user politely about the error message. "
"If the status is 'success', present the weather 'report' clearly and concisely to the user. "
"Only use the tool when a city is mentioned for a weather request.",
tools=[get_weather],
)
print(f"Agent '{weather_agent.name}' created using model '{AGENT_MODEL}'.")
第 4 步:设置运行程序和会话服务
要有效处理对话和运行代理,我们需要两个关键组件:
会话服务(SessionService):该组件跟踪每个用户的对话历史和会话状态。称为InMemorySessionService的基本版本将所有数据存储在内存中,因此非常适合测试或轻量级应用程序。它会记录会话中交换的每一条信息。我们将深入探讨如何永久保存会话数据。
运行程序:它是系统的大脑。它负责管理整个交互流程,接收用户输入,将其传递给正确的代理,调用 LLM 和任何必要的工具,通过SessionService 更新会话数据,并生成事件流以显示交互过程中发生的情况。
代码:
# @title Setup Session Service and Runner
# ---Session Management ---
# Key Concept: SessionService stores conversation history & state.
# InMemorySessionService is a simple, non-persistent storage for this tutorial.
session_service=InMemorySessionService()
# Define constants for identifying the interaction context
APP_NAME="weathertutorial_app"
USER_ID="user_1"
SESSION_ID="session_001"
# Create the specific session where the conversation will happen
session=session_service.create_session(
app_name=APP_NAME,
user_id=USER_ID,
session_id=SESSION_ID,
)
print(f"Session created: App='{APP_NAME}', User='{USER_ID}', Session='{SESSION_ID}'")
# ---Runner ---
# Key Concept: Runner orchestrates the agent execution loop.
runner=Runner(
agent=weather_agent,
app_name=APP_NAME,
session_service=session_service
)
print(f"Runner created for agent '{runner.agent.name}'.")
第 5 步:与代理交互
我们将使用 ADK 的异步运行程序(asynchronous Runner)与代理对话并获取其响应。由于 LLM 和工具调用需要时间,因此异步处理可确保流畅、无阻塞的体验。
我们将创建一个名为 call_agent_async 的辅助函数,执行以下操作:
- 将用户查询作为输入
- 将其封装为 ADK 所需的 Content 格式
- 使用会话和消息调用 runner.run_async()
- 遍历 ADK 返回的事件流,并跟踪每个步骤(工具调用、响应等)。
- 使用 event.is_final_response() 检测并打印最终响应
代码
# @title Define Agent Interaction Function
import asyncio
from google.genai import types # For creating message Content/Parts
async def call_agent_async(query: str):
"""Sends a query to the agent and prints the final response."""
print(f"\n>>> User Query: {query}")
# Prepare the user's message in ADK format
content = types.Content(role='user', parts=[types.Part(text=query)])
final_response_text = "Agent did not produce a final response." # Default
# Key Concept: run_async executes the agent logic and yields Events.
# We iterate through events to find the final answer.
async for event in runner.run_async(user_id=USER_ID, session_id=SESSION_ID, new_message=content):
# You can uncomment the line below to see *all* events during execution
# print(f"  [Event] Author: {event.author}, Type: {type(event).__name__}, Final: {event.is_final_response()}, Content: {event.content}")
# Key Concept: is_final_response() marks the concluding message for the turn.
if event.is_final_response():
if event.content and event.content.parts:
# Assuming text response in the first part
final_response_text = event.content.parts[0].text
elif event.actions and event.actions.escalate: # Handle potential errors/escalations
final_response_text = f"Agent escalated: {event.error_message or 'No specific message.'}"
# Add more checks here if needed (e.g., specific error codes)
break # Stop processing events once the final response is found
print(f"<<< Agent Response: {final_response_text}")
第 6 步:运行对话
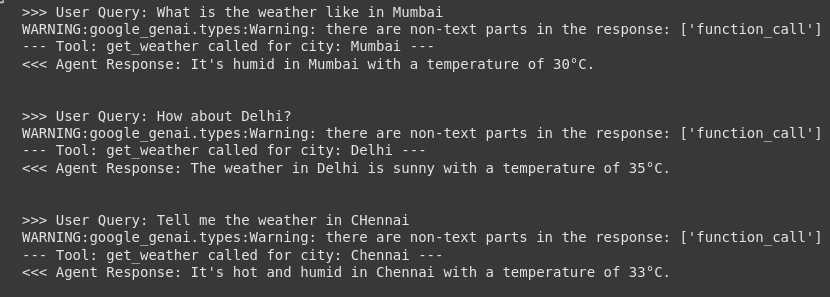
现在,一切都已准备就绪,是时候测试一下我们的代理了,发送几个查询样本。
我们将
- 将异步调用包在 main() 例程中
- 使用 await 运行函数。
预期结果
- 打印用户查询
- 当代理使用工具(如 get_weather)时,你会看到类似以下的日志:- 工具:get_weather 已调用… –代理将返回最终响应,甚至可以优雅地处理数据。
- 代理将返回最终响应,甚至会优雅地处理数据不可用的情况(例如“Paris”)。
代码:
# @title Run the Initial Conversation
# # We need an async function to await our interaction helper
# async def run_conversation():
#     await call_agent_async("What is the weather like in Mumbai")
#     await call_agent_async("How about Delhi?") # Expecting the tool's error message
#     await call_agent_async("Tell me the weather in CHennai")
# Execute the conversation using await in an async context (like Colab/Jupyter)
await run_conversation()
输出:
小结
谷歌的代理开发工具包(ADK)允许开发人员创建超越简单文本生成的智能多代理系统。通过构建天气机器人,我们学习到了 ADK 的关键概念,如工具集成、代理协调和会话管理,同时充分利用了 Google Gemini 的强大功能。从为工具定义清晰的描述性文档,到通过 Runner 和 SessionService 协调交互,ADK 提供了构建可交互、学习和适应的生产就绪型代理的灵活性。无论您是要构建聊天机器人、虚拟助手还是多代理生态系统,ADK 都能为您提供实现愿景的工具。
免责声明
- 本站文章均为原创,除非另有说明,否则本站内容依据 CC BY-NC-SA 4.0 许可证进行授权,转载请附上出处链接及本声明,谢谢。
- 本站提供的资源(插件或主题)均为网上搜集,如有涉及或侵害到您的版权,请立即通过邮箱 admin@wpwpp.com 通知我们。
- 本站所有下载文件,仅用作学习研究使用,下载后请在 24小时内 删除。请支持正版,切勿用作商业用途。
- 因代码可变性,本站不保证兼容所有浏览器、不保证兼容所有版本的 WordPress,不保证兼容您安装的其他插件。
- 本站保证所提供资源(插件或主题)的完整性,但不含授权许可、帮助文档、XML文件、PSD、后续升级等。
- 使用该资源(插件或主题)需要用户有一定代码基础知识!本站只提供汉化及安装教程,仅供参考。由本站提供的资源对您的网站或计算机造成严重后果的,本站概不负责。
- 有时可能会遇到部分字段无法汉化,同时请保留作者汉化宣传信息,谢谢!
- 本站资源售价只是赞助和汉化辛苦费,收取费用仅维持本站的日常运营所需。
- 如果您喜欢本站资源,开通会员享受更多优惠折扣,谢谢支持!
- 如果网盘地址失效,请在相应资源页面下留言,我们会尽快修复下载地址。
- 本站网址:wpwpp.com,联系邮箱:admin@wpwpp.com。


暂无评论内容