

自人工智能聊天机器人兴起以来,谷歌的 Gemini 已成为推动智能系统发展的最强大的角色之一。除了在会话方面的优势外,Gemini 还为计算机视觉带来了实际的可能性,使机器能够看到、解释和描述周围的世界。
本教学指南将指导您如何利用 Google Gemini 进行计算机视觉,包括如何设置环境、发送带有说明的图像,以及如何解释模型的输出以进行对象检测、标题生成和 OCR。我们还将介绍数据注释工具(如用于 YOLO 的工具),以便为自定义训练场景提供上下文。
什么是Google Gemini?
Google Gemini 是一系列人工智能模型,用于处理多种数据类型,如文本、图像、音频和代码。这意味着它们可以处理涉及理解图片和文字的任务。
Google Gemini 2.5 Pro功能
- 多模态输入:它可在单个请求中接受文本和图像的组合。
- 推理:该模型可分析输入信息,执行识别物体或描述场景等任务。
- 指令跟踪:它能响应文本指令(提示),从而指导其分析图像。
这些功能使开发人员能够通过应用程序接口将 Gemini 用于视觉相关任务,而无需为每项工作单独训练一个模型。
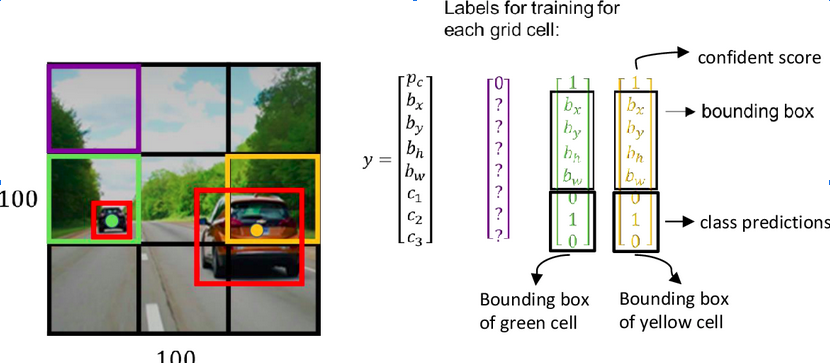
数据注释的作用:YOLO注释器
虽然 Gemini 模型为这些计算机视觉任务提供了强大的零镜头或少镜头功能,但要建立高度专业化的计算机视觉模型,需要在针对特定问题定制的数据集上进行训练。这就是数据注释的关键所在,尤其是对于训练自定义对象检测器等监督学习任务而言。
YOLO 注释器(通常指与 YOLO 格式兼容的工具,如 Labeling、CVAT 或 Roboflow)旨在创建标注数据集。
什么是数据注释?
Source: Link
对于物体检测,标注包括在图像中每个感兴趣的物体周围绘制边框,并指定一个类别标签(如 “汽车”、“人”、“狗”)。这些注释数据会告诉模型在训练过程中需要查找的内容和位置。
注释工具(如YOLO注释器)的主要特点
- 用户界面:它们提供图形界面,允许用户加载图像、绘制方框(或多边形、关键点等)并高效地分配标签。
- 格式兼容性:专为 YOLO 模型设计的工具会将注释保存为 YOLO 训练脚本所期望的特定文本文件格式(通常是每幅图像一个 .txt 文件,包含类索引和归一化边界框坐标)。
- 高效功能:许多工具都包含热键、自动保存等功能,有时还提供模型辅助标注功能,以加快耗时的标注过程。批量处理可更有效地处理大型图像集。
- 集成:使用 YOLO 等标准格式可确保注释数据能够轻松地与包括 Ultralytics YOLO 在内的流行训练框架配合使用。
虽然 Google Gemini for Computer Vision 无需事先注释即可检测一般对象,但如果您需要一个模型来检测非常具体的自定义对象(例如,独特类型的工业设备、特定的产品缺陷),您可能需要收集图像并使用 YOLO 注释器等工具对其进行注释,以训练专用的 YOLO 模型。
代码实现-用于计算机视觉的Google Gemini
首先,您需要安装必要的软件库。
第 1 步:安装先决条件
1. 安装软件库
在终端运行此命令:
!uv pip install -U -q google-genai ultralytics
该命令安装google-genai库,以便与 Gemini API 和 ultralytics 库通信,后者包含处理图片和在图片上绘图的有用函数。
2. 导入模块
在 Python Notebook 中添加这些行:
import json
import cv2
import ultralytics
from google import genai
from google.genai import types
from PIL import Image
from ultralytics.utils.downloads import safe_download
from ultralytics.utils.plotting import Annotator, colors
ultralytics.checks()
这些代码导入了用于读取图像(cv2、PIL)、处理 JSON 数据(json)、与 API 交互(google.generativeai)和实用功能(ultralytics)等任务的库。
3. 配置API密钥
使用 Google AI API 密钥初始化客户端。
# Replace "your_api_key" with your actual key
# Use GenerativeModel for newer versions of the library
# Initialize the Gemini client with your API key
client = genai.Client(api_key=”your_api_key”)
这一步为脚本发送验证请求做好准备。
第 2 步:与Gemini交互的函数
创建一个向模型发送请求的函数。该函数接收图像和文本提示,并返回模型的文本输出。
def inference(image, prompt, temp=0.5):
   """
   Performs inference using Google Gemini 2.5 Pro Experimental model.
   Args:
       image (str or genai.types.Blob): The image input, either as a base64-encoded string or Blob object.
       prompt (str): A text prompt to guide the model's response.
       temp (float, optional): Sampling temperature for response randomness. Default is 0.5.
   Returns:
       str: The text response generated by the Gemini model based on the prompt and image.
   """
   response = client.models.generate_content(
       model="gemini-2.5-pro-exp-03-25",
       contents=[prompt, image],  # Provide both the text prompt and image as input
       config=types.GenerateContentConfig(
           temperature=temp,  # Controls creativity vs. determinism in output
       ),
   )
   return response.text  # Return the generated textual response
说明
- 此函数将图像和您的文本指令(提示)发送到 model_client 中指定的 Gemini 模型。
- 温度设置 (temp) 会影响输出的随机性;数值越低,结果越可预测。
第 3 步:准备图像数据
在向模型发送图像之前,需要正确加载图像。如果需要,该函数将下载图像、读取图像、转换颜色格式并返回PIL 图像对象及其尺寸。
def read_image(filename):
   image_name = safe_download(filename)
   # Read image with opencv
   image = cv2.cvtColor(cv2.imread(f"/content/{image_name}"), cv2.COLOR_BGR2RGB)
   # Extract width and height
   h, w = image.shape[:2]
   # # Read the image using OpenCV and convert it into the PIL format
   return Image.fromarray(image), w, h
说明
- 此函数使用 OpenCV (cv2) 读取图像文件。
- 它将图像颜色顺序转换为标准的 RGB。
- 它将图像返回为适合推理函数的 PIL 对象,并返回其宽度和高度。
第 4 步:结果格式化
def clean_results(results):
   """Clean the results for visualization."""
   return results.strip().removeprefix("```json").removesuffix("```").strip()
该函数将结果格式化为 JSON 格式。
任务 1:对象检测
Gemini 可根据您的文本指令查找图像中的物体并报告其位置(边界框)。
# Define the text prompt
prompt = """
Detect the 2d bounding boxes of objects in image.
"""
# Fixed, plotting function depends on this.
output_prompt = "Return just box_2d and labels, no additional text."
image, w, h = read_image("https://media-cldnry.s-nbcnews.com/image/upload/t_fit-1000w,f_auto,q_auto:best/newscms/2019_02/2706861/190107-messy-desk-stock-cs-910a.jpg")  # Read img, extract width, height
results = inference(image, prompt + output_prompt)  # Perform inference
cln_results = json.loads(clean_results(results))  # Clean results, list convert
annotator = Annotator(image)  # initialize Ultralytics annotator
for idx, item in enumerate(cln_results):
   # By default, gemini model return output with y coordinates first.
   # Scale normalized box coordinates (0–1000) to image dimensions
   y1, x1, y2, x2 = item["box_2d"]  # bbox post processing,
   y1 = y1 / 1000 * h
   x1 = x1 / 1000 * w
   y2 = y2 / 1000 * h
   x2 = x2 / 1000 * w
   if x1 > x2:
       x1, x2 = x2, x1  # Swap x-coordinates if needed
   if y1 > y2:
       y1, y2 = y2, y1  # Swap y-coordinates if needed
   annotator.box_label([x1, y1, x2, y2], label=item["label"], color=colors(idx, True))
Image.fromarray(annotator.result())  # display the output
来源图片:链接
输出
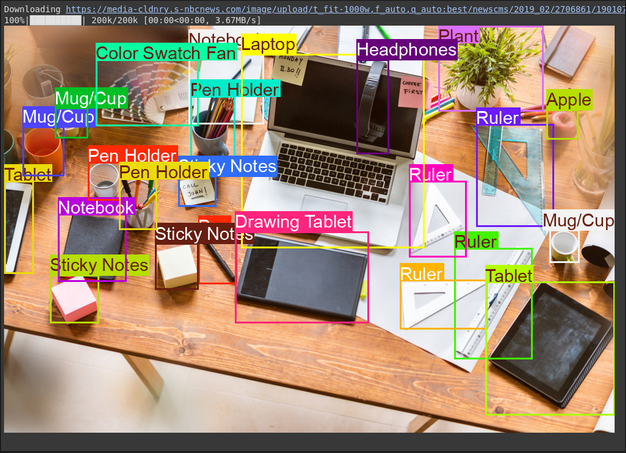
说明
- 该提示告诉模型要查找什么以及如何格式化输出(JSON)。
- 它使用图像的宽度 (w) 和高度 (h) 将归一化方框坐标(0-1000)转换为像素坐标。
- 注释器工具在图像副本上绘制方框和标签
任务 2:测试推理能力
通过 Gemini 模型,您可以使用高级推理来处理复杂的任务,这种推理能够理解上下文并提供更精确的结果。
# Define the text prompt
prompt = """
Detect the 2d bounding box around:
highlight the area of morning light +
PC on table
potted plant
coffee cup on table
"""
# Fixed, plotting function depends on this.
output_prompt = "Return just box_2d and labels, no additional text."
image, w, h = read_image("https://thumbs.dreamstime.com/b/modern-office-workspace-laptop-coffee-cup-cityscape-sunrise-sleek-desk-featuring-stationery-organized-neatly-city-345762953.jpg")  # Read image and extract width, height
results = inference(image, prompt + output_prompt)
# Clean the results and load results in list format
cln_results = json.loads(clean_results(results))
annotator = Annotator(image)  # initialize Ultralytics annotator
for idx, item in enumerate(cln_results):
   # By default, gemini model return output with y coordinates first.
   # Scale normalized box coordinates (0–1000) to image dimensions
   y1, x1, y2, x2 = item["box_2d"]  # bbox post processing,
   y1 = y1 / 1000 * h
   x1 = x1 / 1000 * w
   y2 = y2 / 1000 * h
   x2 = x2 / 1000 * w
   if x1 > x2:
       x1, x2 = x2, x1  # Swap x-coordinates if needed
   if y1 > y2:
       y1, y2 = y2, y1  # Swap y-coordinates if needed
   annotator.box_label([x1, y1, x2, y2], label=item["label"], color=colors(idx, True))
Image.fromarray(annotator.result())  # display the output
来源图片:链接
输出
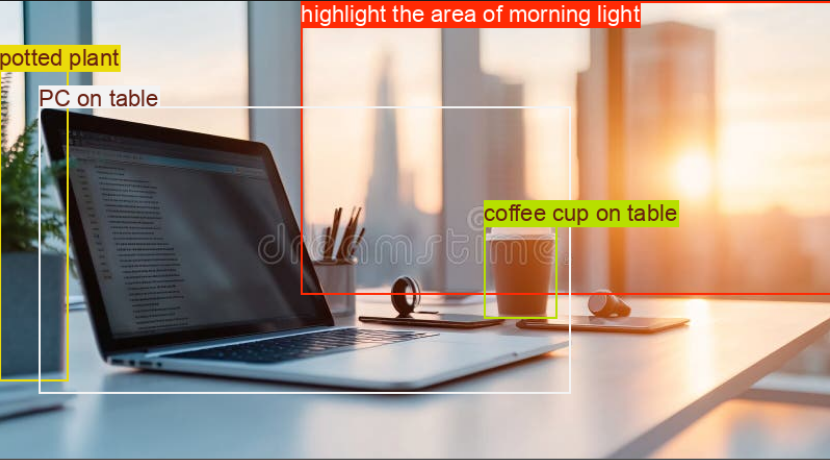
说明
- 此代码块包含一个复杂的提示,用于测试模型的推理能力。
- 它使用图像的宽(w)和高(h)将归一化方框坐标(0-1000)转换为像素坐标。
- 注释器工具会在图像副本上绘制方框和标签。
任务 3:图像说明文字
Gemini 可以为图像创建文字说明。
# Define the text prompt
prompt = """
What's inside the image, generate a detailed captioning in the form of short
story, Make 4-5 lines and start each sentence on a new line.
"""
image, _, _ = read_image("https://cdn.britannica.com/61/93061-050-99147DCE/Statue-of-Liberty-Island-New-York-Bay.jpg")  # Read image and extract width, height
plt.imshow(image)
plt.axis('off')  # Hide axes
plt.show()
print(inference(image, prompt))  # Display the results
来源图片:链接
输出
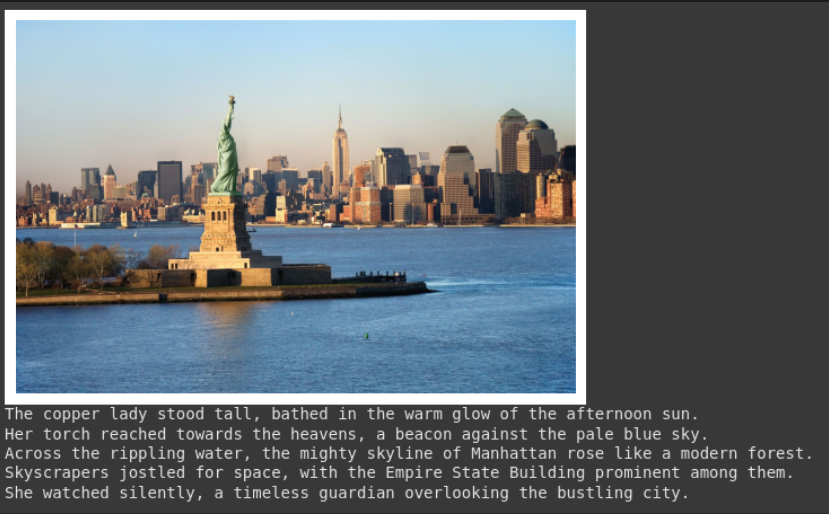
说明
- 该提示要求输入特定样式的说明(叙述式、4 行、新行)。
- 输出中将显示所提供的图片。
- 函数将返回生成的文本。这对创建辅助文本或摘要非常有用。
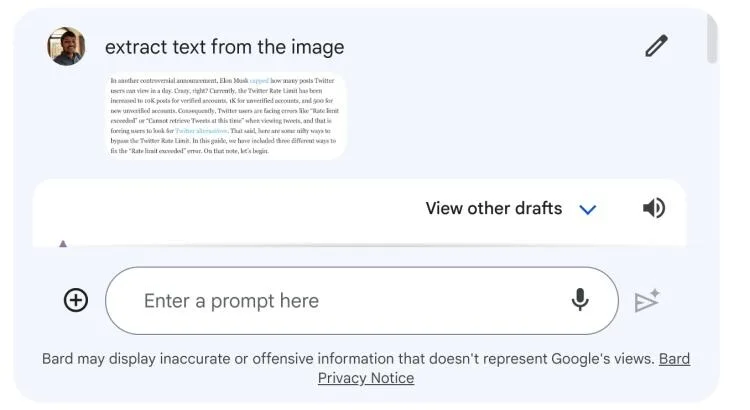
任务 4:光学字符识别(OCR)
Gemini 可以读取图像中的文字,并告诉您在哪里找到这些文字。
# Define the text prompt
prompt = """
Extract the text from the image
"""
# Fixed, plotting function depends on this.
output_prompt = """
Return just box_2d which will be location of detected text areas + label"""
image, w, h = read_image("https://cdn.mos.cms.futurecdn.net/4sUeciYBZHaLoMa5KiYw7h-1200-80.jpg")  # Read image and extract width, height
results = inference(image, prompt + output_prompt)
# Clean the results and load results in list format
cln_results = json.loads(clean_results(results))
print()
annotator = Annotator(image)  # initialize Ultralytics annotator
for idx, item in enumerate(cln_results):
   # By default, gemini model return output with y coordinates first.
   # Scale normalized box coordinates (0–1000) to image dimensions
   y1, x1, y2, x2 = item["box_2d"]  # bbox post processing,
   y1 = y1 / 1000 * h
   x1 = x1 / 1000 * w
   y2 = y2 / 1000 * h
   x2 = x2 / 1000 * w
   if x1 > x2:
       x1, x2 = x2, x1  # Swap x-coordinates if needed
   if y1 > y2:
       y1, y2 = y2, y1  # Swap y-coordinates if needed
   annotator.box_label([x1, y1, x2, y2], label=item["label"], color=colors(idx, True))
Image.fromarray(annotator.result())  # display the output
来源图片:链接
输出

说明
- 该提示与对象检测类似,但要求输入文本(标签)而非对象名称。
- 代码会提取文本及其位置,打印文本并在图像上画出方框。
- 这对于文档数字化或读取照片中标志或标签的文本非常有用。
小结
通过简单的 API 调用,Google Gemini for Computer Vision 可以轻松完成对象检测、图像字幕和 OCR 等任务。通过发送图像和清晰的文字说明,你可以引导模型理解并获得可用的实时结果。
虽然 Gemini 非常适合通用任务或快速实验,但它并不总是最适合高度专业化的用例。假设你正在处理小众对象,或者需要更严格地控制精度。在这种情况下,传统的方法仍然有效:收集数据集,使用 YOLO 标签器等工具对其进行标注,然后根据自己的需要训练一个自定义模型。


暂无评论内容